How to make wave in blender using Animation Node add-on | blender engineer
Hi guys,In this blog I will show you how to make a wave animation using AN(Animation Node) plugin also different types of waves and challenge.As shown in below.
For this tutorial you must have some basic knowledge of the AN add-on.
Links for basic knowledge for AN :squirclear(for written tutorial)and Zach Hixson(Youtube).
So, now let's jump into the blender.
Setting up Scene :
Open up the blender and just click on the splash screen. You will see a cube.
Now scale down the cube in edit mode by pressing TAB(for edit mode) and the press A to select whole object and then press S and scale it down.


And then drag it to the left grid corner as shown
below.


Array modifier is used to make multiple objects instantly for deep knowledge click here.
We are interesting in two values one is number and other is position.Now change the position of of first value to 0(which is x axis) and change the second value to 1(which is y axis) also set the number to 25.


Then apply the array modifier.Now you can see all the different objects are connected because we can not select single object so we need to separate the objects.
So,press TAB to enter in edit mode press A multiple times to select all parts of the objects and then press P to enter in separate menu and select separate by loose parts.

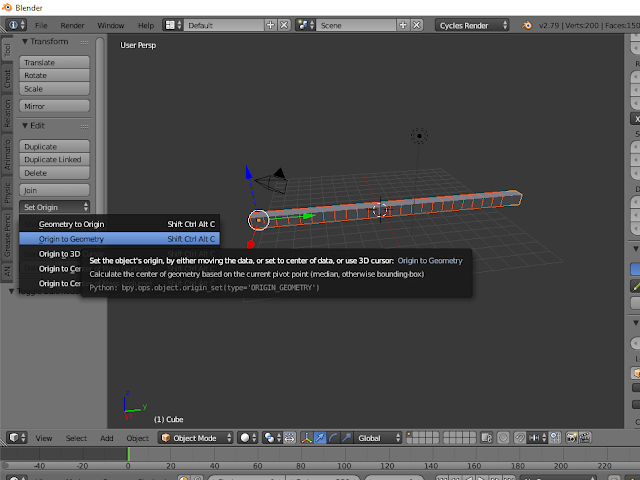
Now you can see we separated objects but all the have same origin of the first cube so we have to assign the to objects.So in object mode select all objects and the press T to open the tool panel if not opened and then in tools you can see set origin tab click and expand and the click on the set origin to the geometry.
Now we have separated the objects and we are ready to jump into the AN to make waves.
Split the view in two parts and set the down part to node editor and make sure diamond icon at bottom part is selected and click on new.


 Now in node editor press SHIFT+A for add menu in and select OBJECTS->FROMGROUP and select the group.
 Then hover the mouse above the group and press W and select loop
 through the objects.
 Now add the matrix output node from objects->matrix output and connect the object node and you will see all the objects are at (0,0,0) position.Now we can use initial transformation we set earlier for that add objects->idkey node and connect the object to it and select the initial transformation and connect matrix to the matrix in matrix output node.


For this tutorial you must have some basic knowledge of the AN add-on.
Links for basic knowledge for AN :squirclear(for written tutorial)and Zach Hixson(Youtube).
So, now let's jump into the blender.
Setting up Scene :
Open up the blender and just click on the splash screen. You will see a cube.
Now scale down the cube in edit mode by pressing TAB(for edit mode) and the press A to select whole object and then press S and scale it down.


And then drag it to the left grid corner as shown
below.

Now we are using array modifier to make multiple object select the cube and in the right of the window there is property panel in which select modifier tab and from there select the array modifier.


Array modifier is used to make multiple objects instantly for deep knowledge click here.
We are interesting in two values one is number and other is position.Now change the position of of first value to 0(which is x axis) and change the second value to 1(which is y axis) also set the number to 25.


Then apply the array modifier.Now you can see all the different objects are connected because we can not select single object so we need to separate the objects.
So,press TAB to enter in edit mode press A multiple times to select all parts of the objects and then press P to enter in separate menu and select separate by loose parts.

Now you can see we separated objects but all the have same origin of the first cube so we have to assign the to objects.So in object mode select all objects and the press T to open the tool panel if not opened and then in tools you can see set origin tab click and expand and the click on the set origin to the geometry.

Now we have separated the objects and we are ready to jump into the AN to make waves.
Split the view in two parts and set the down part to node editor and make sure diamond icon at bottom part is selected and click on new.

We need to make the group of the objects by selecting objects and then press CTRL+G to make a group.You can see objects turn green which represents that they are in groups.

Animation node stuff :
AN doesn't know the position of the objects which I demonstrate later in this tutorial and also doesn't know the order of objects.For order select the objects in order you want I select from left to right and then tool section at bottom their is AN section and then in id key section click on sort objects and select selection order then click ok.

Now in upper section named initial transformation select from current and the positions are set.

 Now in node editor press SHIFT+A for add menu in and select OBJECTS->FROMGROUP and select the group.
 through the objects.
 Now add the matrix output node from objects->matrix output and connect the object node and you will see all the objects are at (0,0,0) position.Now we can use initial transformation we set earlier for that add objects->idkey node and connect the object to it and select the initial transformation and connect matrix to the matrix in matrix output node.
Now our objects are in positions now add matrix->offset and you must click on the small button at start and end section as shown below and connect the matrix node.

And selection location tab.
Now it's time for some math for making wave.
Math :
We can make wave using the sin function. We can use frame as the angle for sin for changing the angle for animating wave.And we can divide frames for slowing the animation.

But you can see that the all objects are doing same there is no wave. For wave we use index for different objects for different angles. Multiply index with some value and subtract from the angle which delay the angle of the sin per objects.

You can see wave when you start the animation shortcut alt+a .We can change multiplication value for different types of waves.

Now we have done making of wave. We can animate when it start and end by using falloffs.
Add point distance fall off from falloff->pointdistance and set location to the beginning you want like I set to (0,-8,0) which is the position of the last object in left. Now you can change size for starting wave.


This is it
Now you can animate the size with frame and apply some materials and your video is ready.
Challenge :
You have to make animation like this (materials not include).
tips :
Every circle must have their origin at different locations in their areas. Then you will able to animate using point falloff.
Comments
Post a Comment